Saturday, June 25, 2011

Reunited and it feels soooooooo good!

Ahhhhhh, my KitchenAid and I have been brought back together *sigh* it was so nice baking this time around with it...how did I ever go withought her? And yes, I said her...her name is Ruby, don't judge. I was able to make my own fondant this time (so much better), except for the black...I thought it would have been SUPER messy coloring that one, so I opted to just buy it. Next time I think I'll just suck it up and color it myself, then there's no difference in the flavor on the cake. Ok...on to the cake! This was suppose to be the topper on a cupcake tower for my friend's little girl's 2nd Birthday. The cake turned out to be too heavy, so it sat in front of the tower. I tried to take as many pics along the way but I got so involved that some things were left out. Here we go!


I used this to make the ears on Minnie hard. Just add to your fondant and knead away until it feels like it's stiffening up. Shape and then let dry at least a day.


Ready to shape!


2 ears! I put lollipop stick in so I could attach them to the head.


Starting the fondant! Powdered sugar and crisco (crisco is underneath all the sugar)


Marshmallows on top


If you plan on using your mixer for this (you can do the fondant by hand, but I feel this is a more sanitary and easier way to do it) make sure when you start mixing, you keep the head of the mixer tilted up a bit, otherwise the powdered sugar in the bowl....will be on your counter.


Oh and make sure you use the dough hook. This is also the point where you can add flavor, or color if you are doing all 1 color. I needed white and pink so I kept this all white.


This is what it looks like when it comes out of the bowl


Now you knead


And knead


Knead some more...


Until you get this! Smooth, soft, and a tad on the tacky side


Cut a chunk off to dye it pink


what you get after you knead the color in . Yes I said knead. I know, I know...you just kneaded. Well, you need to knead again :)


Start of the bow making process. Cut 2 rectangles, brush water on the inside edge, fold over a rolled paper towel to hold it's shape


Pinch the edges on each one then brush with water, and push together


Cut a smaller rectangle out to make the center of the bow. I loved the way this one came out, especially seeing it was my first ever BUT it ended up not being big enough, so at the last minuet, I made a bigger one.


I didn't make Minnie's head out of cake or krispy treats because I was trying to keep it as light as possible. It still wasn't so next time I do something like this I will use cake or the krispy treats. This is a styrofoam ball, cut, and covered in fondant. Make sure, if you use styrofoam, you "dirty ice" it as well, otherwise your fondant will show all the nooks and cranny's.


With the ears.


Strawberry cake before baking.


And after....yum.


Zebra stripes side one.


Side two.


Finished head. See how this bow is much bigger? Looks so much better.


And VoilĂ ! Finished cake!


Marshmallow fondant recipe:
1/2c Crisco
2lbs sifted  powdered sugar
16oz of mini marshmallows
3Tbs of water

In a microwave safe bowl, add marshmallows and water. Microwave for 1min 30sec, the marshmallows wont all look melted, but once you stir them around, you'll see they are.
In your mixer, add the crisco, then the powdered sugar, and then your marshmallows. Turn mixer on low (this is where you want to keep the head of the mixer tilted just a bit until the mixture starts to encorporate) You'll need to whack the sides of the bowl here and there to get the remaining powdered sugar off the sides. Mix on low until it's mostly encorporated and then move to medium and mix until you hear it "slap" the inside of the bowl. Take it out, making sure to get as much out of the bowl as you can, it all has bits of all the good stuff in it. Now knead, knead, knead! This is not bread, you won't over knead it, so don't worry! You want a smooth, soft ball...a little tacky because it's harder to get it sof again if it's too dry. You can always add more sifted sugar if, when you try to roll it out, it just sticks to the surface. If you do happen to get it too dry, add more Crisco, but remember with either one, too dry or too wet, add a little at a time because it doesn't take much to change the consistancy of the dough.
Once you've gotten the desired consistancy make sure you double wrap it, and store in an airtight container. It will store up to 2 weeks on the counter like that, any longer and you want to toss it in the fridge, just warm it up in the micro on power level 3 for 10sec incriments until it's soft again.

Strawberry cake recipe:
I used the recipe from Annie's Eats for her strawberry cupcakes
2¼ cups all-purpose flour
½ cup cake flour
1 tbsp. baking powder
1 tsp. salt
2 sticks (1 cup) unsalted butter, at room temperature
2¼ cups sugar
1½ tsp. vanilla extract
3 large eggs plus 1 large egg white
1 cup milk
2½ cups finely chopped fresh strawberries
Bake at 350 and check it at 35min. Let cool in the pan for 10min and then on wire until completly cooled.

 Strawberry cream cheese frosting from food.com
8 ounces cream cheese, softened
  • 1/4 cup butter, softened

  • 3 -3 1/2 cups powdered sugar, sifted

  • 1/2 cup mashed drained fresh strawberries


    1. Blend together the cream cheese and butter using an electric mixer on low speed until combined, about 30 seconds.
    2. Add 3 cups powdered sugar, gradually, and the mashed strawberries; blend frosting again on low speed until the sugar is incorporated, 1 minute.
    3. Increase mixer speed to medium and blend frosting until fluffy, 30-45 seconds more, adding up to 1/2 cup more sugar to make desired spreading consistency.
    4. Use as desired.

    Sunday, June 19, 2011

    Cookies n' cream cupcakes

    It's not a usual day that I have 2 bakescapades so close together, but today is Father's Day ;) I came across a blog called Annie's Eats not that long ago and I think I printed out 80% of her cupcakes. They all sound so yummy! Here is one of hers. Cookies n Cream cupcakes...enjoy!
    Yield: 24 cupcakes
    Ingredients:
    For the cupcakes:
    24 Oreo halves, with cream filling attached
    2¼ cups all-purpose flour
    1 tsp. baking powder
    ½ tsp. salt
    8 tbsp. unsalted butter, at room temperature
    1 2/3 cup sugar
    3 large egg whites, at room temperature
    2 tsp. vanilla extract
    1 cup milk
    20 Oreo cookies, coarsely chopped (I quarter them)
    For the frosting:
    8 oz. cream cheese, at room temperature
    6 tbsp. unsalted butter, at room temperature
    1 tbsp. vanilla extract
    4 cups confectioners’ sugar, sifted
    2 tbsp. heavy cream
    For garnish:
    Oreo cookie crumbs
    24 Oreo cookie halves
    Directions:
    Preheat the oven to 350˚ F.  Line the wells of two cupcake pans with 24 paper liners.  Place an Oreo halve in the bottom of each liner, cream side up.  In a medium bowl, combine the flour, baking powder and salt; stir together with a fork to blend and set aside.  In the bowl of an electric mixer, combine the butter and sugar and beat together on medium-high speed until light and fluffy, about 2 minutes.  Blend in the egg whites one at a time, beating well after each addition.  Blend in the vanilla extract.  With the mixer on low speed, beat in half of the dry ingredients just until incorporated.  Add the milk and beat just until combined, then mix in the remaining dry ingredients.  Gently fold in the chopped Oreos with a rubber spatula until evenly incorporated, being careful not to over-mix.
    Evenly divide the batter between the prepared cupcake liners.  Bake for 18-20 minutes, rotating the pans halfway through baking, until a toothpick inserted in the center comes out clean.  Allow to cool in the pans 5-10 minutes, then transfer to a wire rack to cool completely.
    To make the frosting, combine the cream cheese and butter in the bowl of an electric mixer and beat on medium-high speed until smooth, about 1 minute.  Blend in the vanilla extract.  Beat in the confectioners’ sugar until incorporated and smooth, 1-2 minutes.  Add the heavy cream to the bowl and beat on medium-low speed just until incorporated, then increase the speed to medium-high and whip for 4 minutes until light and fluffy, scraping down the sides of the bowl as needed.
    Frost the cooled cupcakes as desired.  Sprinkle with Oreo crumbs and garnish with Oreo halves.
    Source-Adapted from Beantown Baker
    Saturday, June 18, 2011

    Birthday Cake

    So this is my 3rd fondant cake...I'm getting better with each one...learning from my goofs lol. Let's start from the beginning.
    Attempting to use a different bowl with my kitchenaid (mine broke)
    
    Gave up and had to use the hand mixer
    
    Cream cheese and butter for the icing
    only had 2 round cake pans, so I used a square and just carved after
    Barbie silhouette
    lettering was a little off, but after it was on, there was no turning back
    finished!

    I used the Magnolia Bakery's Vanilla Birthday Cake recipe-

    Ingredients

      Cake Batter

      • 1 cup unsalted butter, softened
      • 2 cups sugar
      • 4 large eggs, at room temperature
      • 1 1/2 cups self rising flour
      • 1 1/4 cups all-purpose flour
      • 1 cup milk
      • 1 teaspoon vanilla

    Directions

    1. Preheat oven to 350°.
    2. Grease and lightly flour three 9 inch round cake pans, then line the bottoms with waxed paper.
    3. In a large bowl, on the medium speed of an electric mixer, cream the butter until smooth.
    4. Add the sugar gradually and beat until fluffy, about 3 minutes.
    5. Add the eggs one at a time, beating well after each addition.
    6. Combine the flours and add in four parts, alternating with the milk and the vanilla extract, beating well after each addition.
    7. Divide batter among the cake pans.
    8. Bake for 20 to 25 minutes or until a cake tester inserted into center of cake comes out clean.
    9. Let cakes cool in the pans for 10 minutes.
    10. Remove from pans and cool completely on wire rack.
    And I used the Cream Cheese Frosting II recipe from allrecipes.com-
    Ingredients:
    2 8oz packages of cream cheese, softened
    1/2 cup butter softened
    2 cups sifted powdered sugar
    1 tsp vanilla extract
    Directions:
    1.In a medium bowl, cream together the cream cheese and butter until creamy. Mix in the vanilla, then gradually stir in the confectioners' sugar. Store in the refrigerator after use

    Thursday, June 16, 2011

    Monkey Business

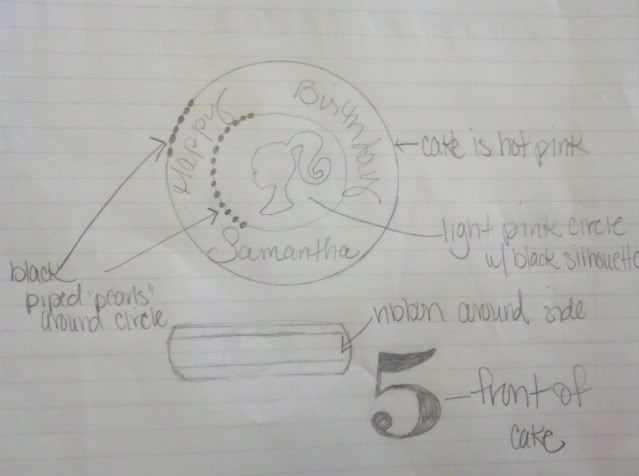
    Thought this would be a fitting title, my kids are my monkeys, so yeah...cheesy. Shoot me. In November I bought myself a Kitchenaid mixer and since then have found I truly love baking...cupcakes especially, but cakes as well. I love being able to create cool designs, and giving someone a custom made cake. This blog will mostly be about my bakescapades...but I'm sure some family stuff will be thrown in there too. I've done some projects already, but this will start from here out. I'm working on my "first" cake tomorrow. Rough sketch-
    Cake will be just a simple 2 or 3 layer cake (haven't decided yet) vanilla, with a vanilla buttercream frosting (per request) although I may dye it pink to go with the Barbie theme. I'll take pics along the way tomorrow!